×

Archive

How To Install Linux, Apache, MySQL, PHP (LAMP) stack On CentOS 7

Introduction

A “LAMP” stack is a group of open source software that is typically installed together to enable a server to host dynamic websites and web apps. This term is actually an acronym which represents the Linux operating system, with the Apache web server. The site data is stored in a MySQL database (using MariaDB), and dynamic content is processed by PHP.

In this guide, we’ll get a LAMP stack installed on an CentOS 7 VPS. CentOS will fulfill our first requirement: a Linux operating system.

Note: The LAMP stack can be installed automatically on your Droplet by adding this script to its User Data when launching it. Check out this tutorial to learn more about Droplet User Data.

Prerequisites

Before you begin with this guide, you should have a separate, non-root user account set up on your server.

Step One — Install Apache

The Apache web server is currently the most popular web server in the world, which makes it a great default choice for hosting a website.

We can install Apache easily using CentOS’s package manager, yum. A package manager allows us to install most software pain-free from a repository maintained by CentOS.

For our purposes, we can get started by typing these commands:

sudo yum install httpd

Since we are using a sudo command, these operations get executed with root privileges. It will ask you for your regular user’s password to verify your intentions.

Afterwards, your web server is installed.

Once it installs, you can start Apache on your VPS:

sudo systemctl start httpd.service

You can do a spot check right away to verify that everything went as planned by visiting your server’s public IP address in your web browser (see the note under the next heading to find out what your public IP address is if you do not have this information already):

http://your_server_IP_address/

You will see the default CentOS 7 Apache web page, which is there for informational and testing purposes. It should look something like this:

CentOS 7 Apache default

If you see this page, then your web server is now correctly installed.

The last thing you will want to do is enable Apache to start on boot. Use the following command to do so:

sudo systemctl enable httpd.service

How To Find your Server’s Public IP Address

If you do not know what your server’s public IP address is, there are a number of ways you can find it. Usually, this is the address you use to connect to your server through SSH.

From the command line, you can find this a few ways. First, you can use the iproute2 tools to get your address by typing this:

ip addr show eth0 | grep inet | awk '{ print $2; }' | sed 's/\/.*$//'

This will give you one or two lines back. They are both correct addresses, but your computer may only be able to use one of them, so feel free to try each one.

An alternative method is to use an outside party to tell you how it sees your server. You can do this by asking a specific server what your IP address is:

curl http://icanhazip.com

Regardless of the method you use to get your IP address, you can type it into your web browser’s address bar to get to your server.

Step Two — Install MySQL (MariaDB)

Now that we have our web server up and running, it is time to install MariaDB, a MySQL drop-in replacement. MariaDB is a community-developed fork of the MySQL relational database management system. Basically, it will organize and provide access to databases where our site can store information.

Again, we can use yum to acquire and install our software. This time, we’ll also install some other “helper” packages that will assist us in getting our components to communicate with each other:

sudo yum install mariadb-server mariadb

When the installation is complete, we need to start MariaDB with the following command:

sudo systemctl start mariadb

Now that our MySQL database is running, we want to run a simple security script that will remove some dangerous defaults and lock down access to our database system a little bit. Start the interactive script by running:

sudo mysql_secure_installation

The prompt will ask you for your current root password. Since you just installed MySQL, you most likely won’t have one, so leave it blank by pressing enter. Then the prompt will ask you if you want to set a root password. Go ahead and enter Y, and follow the instructions:

Enter current password for root (enter for none):
OK, successfully used password, moving on...

Setting the root password ensures that nobody can log into the MariaDB
root user without the proper authorization.

New password: password
Re-enter new password: password
Password updated successfully!
Reloading privilege tables..
 ... Success!

For the rest of the questions, you should simply hit the “ENTER” key through each prompt to accept the default values. This will remove some sample users and databases, disable remote root logins, and load these new rules so that MySQL immediately respects the changes we have made.

The last thing you will want to do is enable MariaDB to start on boot. Use the following command to do so:

sudo systemctl enable mariadb.service

At this point, your database system is now set up and we can move on.

Step Three — Install PHP

PHP is the component of our setup that will process code to display dynamic content. It can run scripts, connect to our MySQL databases to get information, and hand the processed content over to our web server to display.

We can once again leverage the yum system to install our components. We’re going to include the php-mysql package as well:

sudo yum install php php-mysql

This should install PHP without any problems. We need to restart the Apache web server in order for it to work with PHP. You can do this by typing this:

sudo systemctl restart httpd.service

Install PHP Modules

To enhance the functionality of PHP, we can optionally install some additional modules.

To see the available options for PHP modules and libraries, you can type this into your system:

yum search php-

The results are all optional components that you can install. It will give you a short description for each:

php-bcmath.x86_64 : A module for PHP applications for using the bcmath library
php-cli.x86_64 : Command-line interface for PHP
php-common.x86_64 : Common files for PHP
php-dba.x86_64 : A database abstraction layer module for PHP applications
php-devel.x86_64 : Files needed for building PHP extensions
php-embedded.x86_64 : PHP library for embedding in applications
php-enchant.x86_64 : Enchant spelling extension for PHP applications
php-fpm.x86_64 : PHP FastCGI Process Manager
php-gd.x86_64 : A module for PHP applications for using the gd graphics library
. . .

To get more information about what each module does, you can either search the internet, or you can look at the long description in the package by typing:

yum info package_name

There will be a lot of output, with one field called Description which will have a longer explanation of the functionality that the module provides.

For example, to find out what the php-fpm module does, we could type this:

yum info php-fpm

Along with a large amount of other information, you’ll find something that looks like this:

. . .
Summary     : PHP FastCGI Process Manager
URL         : http://www.php.net/
License     : PHP and Zend and BSD
Description : PHP-FPM (FastCGI Process Manager) is an alternative PHP FastCGI
            : implementation with some additional features useful for sites of
            : any size, especially busier sites.

If, after researching, you decide you would like to install a package, you can do so by using the yum install command like we have been doing for our other software.

If we decided that php-fpm is something that we need, we could type:

sudo yum install php-fpm

If you want to install more than one module, you can do that by listing each one, separated by a space, following the yum install command, like this:

sudo yum install package1 package2 ...

At this point, your LAMP stack is installed and configured. We should still test out our PHP though.

Step Four — Test PHP Processing on your Web Server

In order to test that our system is configured properly for PHP, we can create a very basic PHP script.

We will call this script info.php. In order for Apache to find the file and serve it correctly, it must be saved to a very specific directory, which is called the “web root”.

In CentOS 7, this directory is located at /var/www/html/. We can create the file at that location by typing:

sudo vi /var/www/html/info.php

This will open a blank file. We want to put the following text, which is valid PHP code, inside the file:

<?php phpinfo(); ?>

When you are finished, save and close the file.

If you are running a firewall, run the following commands to allow HTTP and HTTPS traffic:

sudo firewall-cmd --permanent --zone=public --add-service=http 
sudo firewall-cmd --permanent --zone=public --add-service=https
sudo firewall-cmd --reload

Now we can test whether our web server can correctly display content generated by a PHP script. To try this out, we just have to visit this page in our web browser. You’ll need your server’s public IP address again.

The address you want to visit will be:

http://your_server_IP_address/info.php

The page that you come to should look something like this:

CentOS 7 default PHP info

This page basically gives you information about your server from the perspective of PHP. It is useful for debugging and to ensure that your settings are being applied correctly.

If this was successful, then your PHP is working as expected.

You probably want to remove this file after this test because it could actually give information about your server to unauthorized users. To do this, you can type this:

sudo rm /var/www/html/info.php

You can always recreate this page if you need to access the information again later.

Conclusion

Now that you have a LAMP stack installed, you have many choices for what to do next. Basically, you’ve installed a platform that will allow you to install most kinds of websites and web software on your server.

How To Install WordPress on CentOS 7

Introduction

WordPress is a free and open source website and blogging tool that uses PHP and MySQL. WordPress is currently the most popular CMS (Content Management System) on the Internet and has over 20,000 plugins to extend its functionality. This makes WordPress a great choice for getting a website up and running quickly and easily.

In this guide, we will demonstrate how to get a WordPress instance set up with an Apache web server on CentOS 7.

Prerequisites

Before you begin with this guide, there are a few steps that need to be completed first.

You will need a CentOS 7 server installed and configured with a non-root user that has sudoprivileges.

Additionally, you’ll need to have a LAMP (Linux, Apache, MySQL, and PHP) stack installed on your CentOS 7 server. If you don’t have these components already installed or configured, you can use this guide to learn how to install LAMP on CentOS 7.

When you are finished with these steps, you can continue with the installation of WordPress.

Step One — Create a MySQL Database and User for WordPress

The first step that we will take is in preparation. WordPress uses a relational database to manage information for the site and its users. We have MariaDB (a fork of MySQL) installed already, which can provide this functionality, but we need to make a database and a user for WordPress to work with.

To get started, log into MySQL’s root (administrative) account by issuing this command:

mysql -u root -p

You will be prompted for the password that you set for the root account when you installed MySQL. Once that password is submitted, you will be given a MySQL command prompt.

First, we’ll create a new database that WordPress can control. You can call this whatever you would like, but I will be calling it wordpress for this example.

CREATE DATABASE wordpress;

Note: Every MySQL statement or command must end in a semi-colon (;), so check to make sure that this is present if you are running into any issues.

Next, we are going to create a new MySQL user account that we will use exclusively to operate on WordPress’s new database. Creating one-function databases and accounts is a good idea, as it allows for better control of permissions and other security needs.

I am going to call the new account wordpressuser and will assign it a password of password. You should definitely use a different username and password, as these examples are not very secure.

CREATE USER wordpressuser@localhost IDENTIFIED BY 'password';

At this point, you have a database and user account that are each specifically made for WordPress. However, the user has no access to the database. We need to link the two components together by granting our user access to the database.

GRANT ALL PRIVILEGES ON wordpress.* TO wordpressuser@localhost IDENTIFIED BY 'password';

Now that the user has access to the database, we need to flush the privileges so that MySQL knows about the recent privilege changes that we’ve made:

FLUSH PRIVILEGES;

Once these commands have all been executed, we can exit out of the MySQL command prompt by typing:

exit

You should now be back to your regular SSH command prompt.

Step Two — Install WordPress

Before we download WordPress, there is one PHP module that we need to install to ensure that it works properly. Without this module, WordPress will not be able to resize images to create thumbnails. We can get that package directly from CentOS’s default repositories using yum:

sudo yum install php-gd

Now we need to restart Apache so that it recognizes the new module:

sudo service httpd restart

We are now ready to download and install WordPress from the project’s website. Luckily, the WordPress team always links the most recent stable version of their software to the same URL, so we can get the most up-to-date version of WordPress by typing this:

cd ~
wget http://wordpress.org/latest.tar.gz

This will download a compressed archive file that contains all of the WordPress files that we need. We can extract the archived files to rebuild the WordPress directory with tar:

tar xzvf latest.tar.gz

You will now have a directory called wordpress in your home directory. We can finish the installation by transferring the unpacked files to Apache’s document root, where it can be served to visitors of our website. We can transfer our WordPress files there with rsync, which will preserve the files’ default permissions:

sudo rsync -avP ~/wordpress/ /var/www/html/

rysnc will safely copy all of the contents from the directory you unpacked to the document root at /var/www/html/. However, we still need to add a folder for WordPress to store uploaded files. We can do that with the mkdir command:

mkdir /var/www/html/wp-content/uploads

Now we need to assign the correct ownership and permissions to our WordPress files and folders. This will increase security while still allowing WordPress to function as intended. To do this, we’ll use chown to grant ownership to Apache’s user and group:

sudo chown -R apache:apache /var/www/html/*

With this change, the web server will be able to create and modify WordPress files, and will also allow us to upload content to the server.

Step Three — Configure WordPress

Most of the configuration required to use WordPress will be completed through a web interface later on. However, we need to do some work from the command line to ensure that WordPress can connect to the MySQL database that we created for it.

Begin by moving into the Apache root directory where you installed WordPress:

cd /var/www/html

The main configuration file that WordPress relies on is called wp-config.php. A sample configuration file that mostly matches the settings we need is included by default. All we have to do is copy it to the default configuration file location, so that WordPress can recognize and use the file:

cp wp-config-sample.php wp-config.php

Now that we have a configuration file to work with, let’s open it in a text editor:

nano wp-config.php

The only modifications we need to make to this file are to the parameters that hold our database information. We will need to find the section titled MySQL settings and change the DB_NAMEDB_USER, and DB_PASSWORD variables in order for WordPress to correctly connect and authenticate to the database that we created.

Fill in the values of these parameters with the information for the database that you created. It should look like this:

// ** MySQL settings - You can get this info from your web host ** //
/** The name of the database for WordPress */
define('DB_NAME', 'wordpress');

/** MySQL database username */
define('DB_USER', 'wordpressuser');

/** MySQL database password */
define('DB_PASSWORD', 'password');

These are the only values that you need to change, so save and close the file when you are finished.

Step Four — Complete Installation Through the Web Interface

Now that you have your files in place and your software is configured, you can complete the WordPress installation through the web interface. In your web browser, navigate to your server’s domain name or public IP address:

http://server_domain_name_or_IP

First, you will need to select the language that you would like to install WordPress with. After selecting a language and clicking on Continue, you will be presented with the WordPress initial configuration page, where you will create an initial administrator account:

WordPress Web Install

Fill out the information for the site and administrative account that you wish to make. When you are finished, click on the Install WordPress button at the bottom to continue.

WordPress will confirm the installation, and then ask you to log in with the account that you just created:

WordPress Success

To continue, hit the Log in button at the bottom, then fill out your administrator account information:

WordPress Login

After hitting Log in, you will be presented with your new WordPress dashboard:

WordPress Dashboard

How to Secure Your Hybrid Cloud Infrastructure

Today, many organisations and enterprises are moving into a more hybrid cloud environment. And why not? Hybrid clouds are agile – they adapt and change to the needs of the organisation. With their unique mix of private,on-premises clouds and public clouds, you can get the scalability, low cost and reliability of a public cloud, while you can get the security, control and customisation and flexibility of a private cloud- It is the best of both worlds. It is projected that by 2020, almost 90 per cent of organisations would have shifted to a hybrid cloud environment (source). However, due to this flexibility and these two worlds (private and public) the security of a hybrid cloud becomes a bit more challenging. In this article, we’re going to look at how to secure hybrid cloud.

What is Hybrid Cloud?

Simply put, a hybrid cloud is an environment that uses a mix of third-party public clouds and on-premises, private cloud – with orchestration between the two. When workloads move between these two platforms – the private and public clouds – you get greater flexibility and more data deployment options. This allows you to respond to computing changes and business needs with agility. Sounds good right?

In order to establish this unique cloud computing environment, you need the availability of a public Infrastructure as a Service (IaaS) like AWS (Amazon Web Services) Google Cloud Platform or Microsoft Azure. Secondly, you need the construction of a private cloud (either through a cloud provider or on your own premises). The third component is a good Wide Area Network (WAN) connectivity between the public and private cloud. Finally, you need to make sure that your Hybrid Cloud is secure. This is where the matter of hybrid cloud security comes in – why is it important and what does it entail?

Hybrid Cloud Security

While you may have a firm grip on the data in your own private cloud, once you begin to venture into the public cloud space, things become more complex. As more enterprises move to a hybrid cloud environment, more data security concerns arise. These are the top concerns:

  1. Cross-Cloud Policy Management:
    While policies and procedures within the organisation’s private data centre are set, these policies might not transfer well when it comes to the public cloud. Therefore, the challenge is to create, configure and maintain a security policy that is uniform across the entire network. This includes firewall rules, user identification/ authentication and IPS signatures amongst other things.
  2. Data Leaks:
    A key issue for data security administrators is data visibility. When it comes to deciding where data should be stored, organisations must put in the time, care and a tremendous amount of thought. And even then, it’s easy to lose track of the data without ensuring proper data visibility.
  3. Data compliance: 
    Before organisations can move data and applications to a service provider cloud, they must make sure they understand all regulatory compliance laws that apply to their data – whether that’s customer credit card data or data spread across multiple geographical locations. Ultimately, it’s the responsibility of the organisation to make sure data of any nature is well-protected. Cloud providers and Cloud web hosting service providers will tell organisations which compliance standards they adhere to. If more is required then the responsibility lies with the organisation to spell out those needs.
  4. Scalability: 
    All security tools, procedures and practices need to be scaled for growth. If that hasn’t been done, companies can hit roadblocks because they neglected to build a security architecture that scales itself to the organisation’s infrastructure resources.

This brings us to the final question: How to secure Hybrid Cloud?

While hybrid cloud environments are more complex, there are multiple hybrid cloud security solutions and practices organisations can put in place, to keep it secure.

  1. Isolate Critical Infrastructure: Organisations store incredibly sensitive data on the cloud. However, access to this data needs to be isolated and restricted to a few key personnel, or those who specifically require it.
  2. Securing Endpoints: Using the cloud infrastructure does not remove the need for endpoint security. Often, threats and attacks start at the endpoint level. Accordingly, enterprises and organisations need to implement proper endpoint security by choosing comprehensive security solutions that offer application whitelisting and browser exploit protection.
  3. Encrypting data: Data – in transit and at rest – needs to be encrypted as a security measure. Organisations must also protect data, while it’s being used and processed by a cloud application. This will ensure that the data is protected for its entire lifecycle. While encryption methods vary according to service providers, organisations can choose the encryption method they prefer and then look for hosting providers who offer the same.
  4. Back up Data: It is essential that organisations backup their data – both physically and virtually – in case an attack or system failure leads to a loss of data (either temporary or permanent). Backing up data for your website and other applications will ensure that the data is accessible at all times.  
  5. Create a continuity and recovery plan: It’s vital that organisations create a backup plan to ensure that operations continue to run smoothly in a time of crisis (this could include power outages at data centres or disruption of services). A recovery plan could include image-based backups, which will create copies of computers or VMs, which can be used to recover or restore data.
  6. Risk Assessment: One good practice for organisations to follow is to constantly update risk assessment and analysis practices. That way, organisations can review the cloud provider’s compliance status and security capabilities. It also allows organisations to look at their own internal development and orchestration tools. Organisations must also keep an eye on operation management, monitoring tools, security toolsand controls – both internally and in the public cloud. Vigilance like this allows security teams to maintain clarity and confidence in the controls that are currently in place and will give them time to modify them if required.
  7. Choose a Reliable Web Hosting Provider: When choosing a Cloud Hosting provider for your website, organisations must look at the security capabilities. The service provider should be aware that security is a key concern and they should provide adequate security measures to keep your data safe. Good Cloud Hosting providers use the storage systems to ensure unshakeable stability. This ensures that you don’t have to worry about the loss of data due to hardware failures.

Ultimately, every hybrid cloud security issue has a corresponding solution. The trick is to identify specific problems early and then create a comprehensive security solution. If organisations do that, they will end up with a powerful hybrid cloud that functions smoothly, is easy to manage and remains secure.

5 Reasons to Avoid Cheap Or Free Cloud Hosting

 Choose the Right website hosting is crucial to the success of your online business and so is the choice of the hosting provider. A quick google search would list a number of web hosting services for you to choose. From cheap to costly the options are many and at first glance, the price can be an important factor used to convert visitors to customers. However, not everything that is cheap is wonderful, sometimes it might just prove to be not worth it in the long run.

In this article, we’ll talk about cheap or free cloud hosting and list down 5 reasons why it is best to avoid such web hosting services. So without further ado, let us begin!

What matters?

There are several features customers look out for when it comes to choosing web hosting for their website – performance and speed being the top two, with Cloud Hosting being the best bet. And in this quest of finding the best hosting service, we often times neglect another important feature – cost.

This is probably because we see a lot of hosting companies offering free or cheap web hosting with reasonable features and it seems like the best bet especially at the start. Be that as it may, a free or cheap web hosting can really mess up your website resulting in poor performance and unhappy customers.

Whether you are considering going for cheap Cloud Hosting due to limited funds or have already purchased it, we ask you to scroll down and consider the 5 reasons you should avoid free or cheap cloud web hosting for your website.

5 Reasons to Avoid Cheap Cloud Hosting

  1. Poor Page Load Speed 
    Cloud Hosting, in general, is known for its fast page load speed and scalability. In fact, according to a report by Hubspot, the ideal page load speed for a website’s HTML should be less than 1.5 seconds. Given these statistics, it is evident that Cloud Hosting is the most logical choice for blazing fast website speed. 
    However, with cheap Cloud Hosting, there are two factors to be considered:
    1. Is the Cloud Hosting cheap always or
    2. Is there some promo going on 
      If the prices of Cloud Hosting are always on the cheaper end, chances are the server is hosted in a Shared Hosting platform. Here multiple websites share the same server which, in turn, might impact the page load speed of your website. However, if the case is the latter then do your research thoroughly because the Cloud Hosting might be good and the provider might just be running the promo to up their sales in the competitive market.
  2. Negative impact on SEO and rankings
    Speed impacts SEO (Search Engine Optimisation). Google considers page load speed while determining the page rank it assigns to a particular page. In fact, this is of utmost importance when it comes to mobile searches.If your website speed is slow then your page will load slower from the server end which would eventually affect your google page rank. Thus, cheap Cloud Hosting has a negative impact on SEO and page rankings.
  3. Uptime/Downtime issues 
    Cheap hosting spells server issues. If the server your website is hosted on is down there will be a lot of downtimes. This is mostly true because multiple websites share the same server space and there is limited bandwidth. Thus, if a particular website receives heavy traffic it might not only affect the performance of that website but also of the other websites hosted on the server. Moreover, if your server faces a lot of downtimes, it will indirectly affect the uptime and your website may not recover as fast as it should have.
  4. Security Concerns 
    Everything comes with a price! Cheap or free Cloud Hosting doesn’t guarantee security. This means your website is vulnerable to security flaws, malicious viruses and so on. Furthermore, with multiple websites sharing the same server and a lack of firewall can increase your security concerns. You may have your own security in place, however, if the server is compromised all is lost.
  5. Customer Support 
    Most cheap or free hosting services do not offer managed support to their clients. This means that if you are not tech savvy you might land yourself in a glitch. Before choosing a free hosting provider, make sure to check if they have good customer support via calls/emails/tickets/chats. If you feel anything is lacking then it is wise to not go ahead with the deal. After all, good support is helpful in times of need.

Conclusion:

Cheap Hosting may seem like a lucrative option at the start, however, in the long run, it is far more expensive than a slightly high priced hosting might be. So the next time you are tempted to opt for cheap Cloud Hosting we suggest you go a step further and research if it is really value for money or just making a hole in your pocket.

We at ResellerClub offer affordable Cloud Hosting that assures blazing fast website load speed with the use of varnish cache, impeccable support, 99.9% uptime, high performance and scalability. Check out our Cloud Hosting plans.

If you have any queries or suggestions feel free to leave them in the comments box below!

All You Need to Know About Hypervisors

Sitting at the core of virtualization is a well-known but little-discussed technology called the Hypervisor. The hypervisor is a layer of software which enables single hardware to host multiple, isolated virtual machines. It also helps with the management of those virtual machines. But before we talk about how the hypervisor works, the types of hypervisors and the benefits of this technology, let’s put some basic definitions in place. We’ll start with a technology that is tied very closely to hypervisors – virtualization.

What is virtualization?  

Virtualization is the creation of a “virtual” form of a resource, such as a server, a desktop, an operating system, storage space, network or files. With virtualization, traditional computing is transformed, as these resources become scalable as per a client or organisation’s needs. Virtualization has been around for decades and is now split into three distinct types – Operating System (OS) virtualization, hardware virtualization and server virtualization.

Virtualization is used to consolidate workloads, systems and multiple operating environments on one single physical system. Essentially the underlying hardware is partitioned, and each partition runs as a separate, isolated Virtual Machine – which has its own Operating System. Now, this is where the hypervisor comes in.

What is a hypervisor?

The function of partitioning, or more specifically, abstracting and isolating these different OS and applications from the underlying computer hardware is what the hypervisor does. Therefore, it wouldn’t be incorrect to say that virtualization is enabled by the functions of the hypervisor.

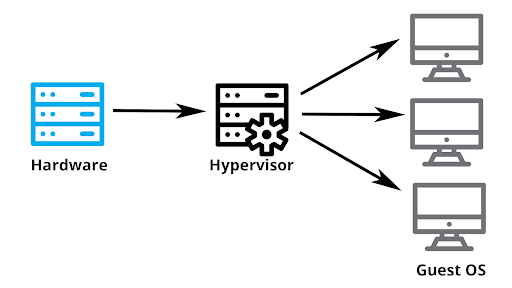
What this means is that the underlying hardware (which is known as the host machine) can independently operate and run one or more virtual machines (known as guest machines). The hypervisor also helps manage these independent Virtual Machines by distributing hardware resources such as memory allotment, CPU usage network bandwidth and more amongst them. It does this by creating pools of abstracted hardware resources, which it then allocates to Virtual Machines. It also can stop and start virtual machines, when requested by the user.

Another key component of hypervisors is ensuring that all the Virtual Machines stay isolated from others – so when a problem occurs in one Virtual Machine, the others remain unaffected. Finally, the hypervisor also handles the communication amongst Virtual Machines over virtual networks – enabling VMs to connect with one another.

How does a hypervisor work?

To understand how hypervisors work, it’s important to understand – what are the types of hypervisors? How do they work? What is the difference?

There are 2 types of Hypervisors. They’re also referred to as Native or Bare Metal Hypervisors (Type 1) and Hosted Hypervisors (Type 2).

Type 1 Hypervisors:

Type 1 hypervisors run on the host machine’s hardware directly, without the intervention of an underlying Operating System. This means that the hypervisor has direct hardware access without contending with the Operating System and drivers.

Type 1 is widely acknowledged as the best-performing and most efficient hypervisors for enterprise computing. The ability to directly assign resources makes these hypervisors more scalable, but the advantages go further than that:

  1. Optimisation of Physical Resources: Organisations often burn funds quickly by buying separate servers for different applications – an endeavour that is time-consuming and takes up data centre space. With Type 1 hypervisors, IT can utilize server hardware, which frees up data centre costs and real estate and cuts down on energy usage.
  2. Greater Resource Allocation: Most Type 1 hypervisors give admins the opportunity to manually set resource allocation, based on the application’s priority. Many Type 1 hypervisors also automate resource allocation as required, allowing resource management to be a dynamic and customised option.  

The best-known examples of Type 1 hypervisors are VMware’s ESXi and Microsoft’s Hyper-V.

Type 2 Hypervisors

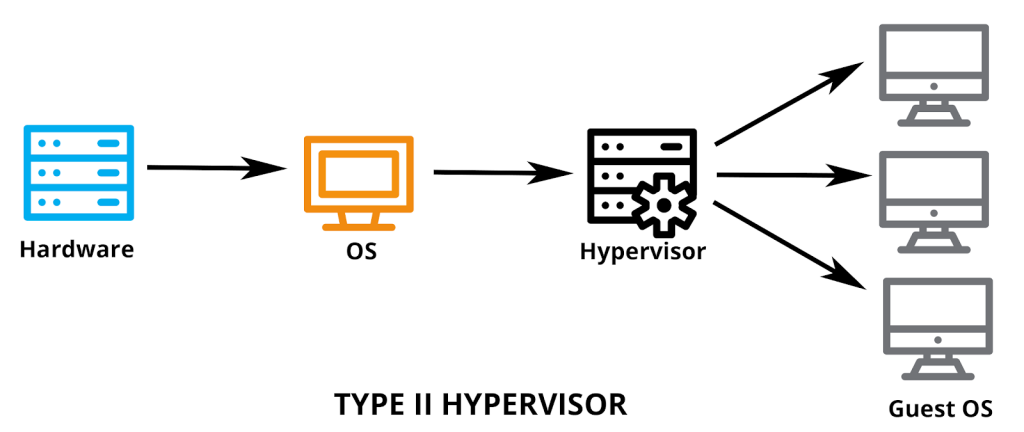
Typically, these hypervisors are built on top of the Operating System. Because of its reliance on the host machine’s underlying Operating System (in direct contrast to Type 1), it is referred to as “hosted hypervisor”. The hypervisor runs as an application within the Operating System, which then runs directly on the host computer. Type 2 hypervisors do support multiple guest machines but are not allowed to directly access the host hardware and its resources. The pre-existing Operating System manages the calls to the CPU for memory, network resources and storage. All of this can create a certain amount of latency.

However, this is only the case for more complex and high-performance scenarios. Type 2 hypervisors are still popular home and test labs.  Furthermore, Type 2 hypervisors come with their own set of benefits, like:

  1. Type 2 Hypervisors are much easier to set up and to manage as you already have an Operating System to work with.
  2. It does not require a dedicated admin.
  3. It is compatible with a wide range of hardware.

Examples of type-2 hypervisors include Oracle Solaris Zones, Oracle VM Server for x86, Oracle VM Virtual Box, VMware Workstation, VMware Fusion and more.  

KVM

KVM (Kernel-based Virtual Machine) a popular and unique hypervisor – seeing as it has characteristics of both Type 1 and Type 2 hypervisors. This open sourced virtualization technology is built into Linux, and more specifically turns Linux into a hypervisor.

To be clear, KVM is a part of the Linux code, which means it benefits from every Linux innovation or advancement, features and fixes without additional engineering.

VM converts Linux into a Type-1 (native/bare-metal) hypervisor. It is a secure option, that gives you plenty of storage, hardware support, memory management, live migration of your VM (without any service interruption), scalability, scheduling and resource control, low latency and greater prioritization of apps. KVM also creates more secure and better isolated Virtual Machines, while ensuring that they continue to run at peak performance. Excited to use all of these features? Well, when you sign up for a Linux VPS Hosting plan with us, KVM will automatically become a part of the packages you create. Check out our array web hosting packageshere.

Protecting Your Business From Increasingly Sophisticated Cyberattacks

Whether you’re leading a Fortune 500 company or your own small business, cybersecurity must be a fundamental business objective. Several high-profile cyberattacks in the first half of 2017 have affected organizations of all sizes all over the world, and these attacks are only going to become more common and more sophisticated.

As a business leader, it’s important to understand that the threat is constant. Even if you’ve never experienced an attack, your servers are perpetually being scanned by hackers for vulnerabilities — and the damage can be fatal to your business. A cyberattack can result in the loss of critical information, putting the reputation of your brand at stake.

If you suffer a cyberattack and are able to react quickly, it’s certainly possible to mitigate the damage to your business and your customers, though containing an attack can get tremendously expensive. If you have a plan in place, however, you can save yourself a lot of time and money — and protect the future of your business.

Diagnosing the Threat

There are countless types of cyberattacks, including malware, phishing, rogue software, and many others. But over the past couple of years, hackers have increasingly favored distributed-denial-of-service (DDoS) attacks when targeting businesses.

There are essentially three types of DDoS attacks.

A volume-based attack overloads servers with data, rendering the victim’s website inaccessible. This is the type of attack that generally makes the news, as roughly 90 percent of DDoS attacks are volume-based. The other 10 percent are split between protocol attacks, which drain your servers’ resources by overloading them with requests, and application-layer attacks, which perform specific requests to extract important information from your servers, such as credit card details or user logins.

Good Bots vs. Bad Bots

The key characteristic of DDoS attacks is the use of bots to do the dirty work, and bots are everywhere. In fact, if you analyze a typical website, you’ll find that around 61 percent of traffic is actually nonhuman and attributed to bots.

A bot is usually a software program that runs simple and repetitive automated tasks over the internet. Google’s crawler is perhaps the most famous example. The crawler scours websites, analyzing text, titles, page speed, inbound links, and other factors to determine the ranking of the site. This is typically a good thing — as a publisher, you want the Google crawler to get on your page and rank you as highly as possible.

Likewise, communication on many websites — including news platforms, reservation sites, and shopping sites — is often conducted through chatbots. These bots allow companies to cut costs and better serve their customers.

But bots can also be used to cause harm.

During a DDoS attack, a bot herder usually controls huge botnets, or robot networks, via a control server and manipulates them into behaving a certain way to extract as much valuable information as possible from a targeted website. This is the same mechanism behind a remote file inclusion (RFI) attack or cross-site scripting (XSS) attack.

Attacks in Action

Hackers are getting more creative when it comes to cyberattacks, and the threats are becoming more serious — and expensive. For example,in 2016, U.K.-based betting company William Hill had its website knocked offline as a result of a DDoS attack. Fortunately, the attack didn’t occur during a major sporting event, but it could have cost the company an estimated £4.4 million.

Ransomware is another type of cyberattack that is becoming more common, and hackers are becoming more original. For instance, the Romantik Seehotel Jägerwirt, a hotel in Austria, was ransomed early in 2017. But rather than simply take control of the hotel’s website and demand money, the hackers took it a step further by locking guests out of their rooms and shutting down the hotel’s reservation system.

Some types of cyberattacks are more sinister in that they do more than simply knock a company’s website offline or demand money. In 2015, for example, PokerStars was hacked by a bot that gave certain players an unfair advantage and helped them win a combined $1.5 million. Because poker isn’t a completely randomized game and you can win with the right calculations, bots and artificial intelligence tactics are becoming a more common problem within the industry.

And no industry is immune to hackers — sometimes, the attacks may even come from competitors. Here at UnifyHOST we once saw a unique attack on an airline website that looked like a simple seat reservation. But as we analyzed the request, we noticed that it went through the entire reservation process of choosing a carrier, departure time, destination, and price, but then it immediately stopped once it was time to pay.

We then realized that the request was carried out by a bot, and the intent was to show the flight as being completely booked. That way, when real customers visited the site to make a reservation and saw that there were no open seats, they’d go to a competitor — which is exactly what the hacker wanted.

Albert Einstein once said, “Intellectuals solve problems; geniuses prevent them.” The same theory holds true with cybersecurity. Because cyberattacks are a growing problem across all industries, nobody is immune to threats. You can resolve them once they happen (after they’ve already cost your company a lot of money and, more importantly, potentially harmed your brand reputation), or you can create a cybersecurity plan to ensure they never happen in the first place.

3 Ways to Safeguard Your Company From a Ransomware Attack

Ransomware attacks have been around for decades, and they continue to wreak havoc on systems around the world.

However, gone are the days when biologists spread the ransomware attack PC Cyborg through floppy disks to innocent victims. Attacks have gotten bigger and more dangerous; we are now all too familiar with attacks like Osiris, CryptoLocker, and WannaCry, which collectively infected hundreds of thousands of computers in over 100 countries, costing millions of dollars in damage.

Ransomware attacks continue to be an issue due to the continual development of new techniques for infecting systems. We have seen a major increase in occurrences over the last few years, resulting in the constant development of techniques used to safeguard systems against these intrusive attacks.

How Ransomware Works

This type of malware is extremely frustrating to deal with, given its intrusive and hostile nature. This software runs illegally on systems to block users from accessing their data until they pay a ransom to the hacker.

This type of illegal threat to data often presents itself through a type of Trojan that exploits security loopholes in web browsers. Ransomware is typically embedded in plug-ins or email attachments that can spread quickly throughout a system once it is inside.

In order to combat this devastating situation, IT experts recommend that companies develop and implement solid ransomware protection strategies. Strategies should aim to prevent data loss resulting from Trojans like CryptoLocker and others under development.

Although several IT security professionals believe companies can enable ransomware protection by using network shares, ransomware is quickly being developed to access network shares, exploiting vulnerabilities in these systems to access information.

How to Protect Your Company from Ransomware Attacks

There may be instances where criminals attempt to attack the backup software itself. That’s why it’s important to develop a robust self-defense mechanism for backing up your file contents and preventing criminals from disrupting system applications. Some steps you can take to protect your data are:

1. Back Up Your Data with the Cloud

It is crucial for companies to routinely back up their locally stored data in order to prevent loss in the case of an attack. Traditional methods of backing up data consume many storage resources, which can negatively impact a computer’s performance.

Backing up your data is now easier due to the reliability and resiliency of cloud storage. Cloud technology streamlines the backup process, giving you the ability to back up your information frequently and easily.

2. Implement Virus Protection Programs

Active Protection programs work several ways to prevent unauthorized activity on your computers. First, they are designed to monitor the Master Boot Record in Windows-based systems. These programs prevent any changes from being made within the system, which would otherwise prevent you from being able to properly boot up your computer.

Many ransomware programs copy files and place them in AppData and LocalAppData folders while masking themselves as standard processes within Windows. To combat this, these programs prevent applications within these folders from being launched.

Additionally, it’s crucial for you to keep your operating system and applications updated. Many ransomware programs are designed to exploit software vulnerabilities, which can be closed by installing patches and updates.

3. Stay Secure With Cloud Storage

Clouds are typically just as safe and secure as private servers, and they are equipped with elaborate access control and encryption technology that can be expanded to meet all of your storage needs. In addition to protecting your data against ransomware attacks, clouds also contain security to protect your files and information against DDoS attacks.

Despite minor shortcomings in cloud storage, they’re great at protecting businesses from ransomware attacks. Clouds present scalability that allows users to keep up with constant development of malware technology. Although the nature of an attack is unlikely to change, the delivery methods used will continue to develop, and cloud services will be there to adjust quickly and provide constant protection.

Is it worth investing in Disaster Recovery?

Investing upfront in the mitigation of potential disasters will save your company and network in the long run. In the world of reliable hosting, for example, each infrastructure deployment includes all kinds of high availability (HA) and disaster recovery (DR) solutions. Investing in HA and DR solutions upfront will enable business continuity, avoid a lot of stress, and save you from the potentially devastating recovery costs.

What is disaster recovery?

According to TechTarget, “disaster recovery is an area of security planning that aims to protect an organization from the effects of significant negative events. DR allows an organization to maintain or quickly resume mission-critical functions following a disaster.”

This means that implementing DR requires a different approach for every organization, as each organization has its own mission-critical functions. Typically, some mission-critical functions run on or rely on IT infrastructure. Therefore, it is good to look at DR within the context of this (hosted) infrastructure; however, it should be part of business continuity planning as a whole.

Important questions to ask when you plan and design your mission-critical hosting infrastructure include:

  • How much time am I prepared to have my mission-critical functions unavailable (RTO)?
  • How much data am I prepared to lose, i.e. the time duration for which you will not be able to recover your data (RPO). For example, if you safely backup your data once a day, you can lose up to one day of data when a disaster happens.
  • How much money will it cost the organization (per hour) when the mission-critical services are not available? DR measures include prevention, detection and correction.

Disaster recovery for common failures

Most hosting services include disaster recovery for most common failures such as failure of a physical disk, server, network switch, network uplink connection, or power feed. This is referred to as High Availability (HA).

A redundant setup solves failures as if an element fails, another infrastructure piece takes over. Redundant networking devices and cabling, multiple power feeds, seamless failover to battery power, and separate power generators that can run forever play an important role in keeping IT infrastructure and thus your software services up and running. Also in case of a fire in a data center, the fire is typically detected early and extinguished through gas (reduction of oxygen), without even affecting most equipment in the same data center hall. This means that most ‘disasters’ are being recovered without impacting the availability of the infrastructure services.

One of the most commonly used tools in DR is creating a frequent backup of your data. If a disaster occurs, you can then restore your backup and relaunch your mission-critical functions and other services.

For faster relaunch of your services after a disaster, replication of your application servers and data can come in handy, as it is readily available to relaunch, compared to backups that would first need to be restored (which takes more time).

Preparing for critical disasters

To mitigate risks of larger disasters which are much less likely to happen, an alternative IT infrastructure environment to run your mission-critical functions can help to enable your business continuity.

Some choose to backup critical data to another location. Others replicate application servers and data to another location, with available hosting infrastructure, to be able to relaunch application services quickly or to have a seamless failover without service interruption.

In case you need to mitigate the risk of failure of the entire environment, the common solution is to include a failover data center site in your IT infrastructure setup. Disaster recovery by means of adding an alternative data center (also called Twin DC setup) also requires a tailored approach to identify the right setup for your applications and mission-critical functions.

Another important facet is to implement applications that can deal with infrastructure failures. Where in the past it was more common to trust on the underlying infrastructure for high availability, it has become more popular to implement applications in such a way that underlying (cheaper) infrastructure may (and will) fail, without impacting the availability of the mission-critical functions.

This means finding a balance between investing in more reliable hosting infrastructure, applications that deal with failures in the underlying infrastructure, and planning and preparing failover to an alternative infrastructure environment.

Making optimal use of DR investments

To make optimal use of DR investments you can choose to use the extra resources in a second datacenter even when there is no failover due to a large disaster in the primary data center location. You can spread workloads between both data centers, for example with half of the workloads running in each data center A. During a disaster, non-mission-critical services can be stopped to make space for mission-critical services to failover.

Another example is when all applications run in the primary data center, and only those applications and data related to the mission-critical functions are replicated and fail over to a second data center in case of disaster (active-passive).

The main takeaways

As every business is different when carrying out business continuity planning every organization should have their own approach to disaster recovery. The challenge for these organizations is going to be balancing the tools and methods available. The goal, however, should be clear for everyone – invest upfront to prevent higher recovery costs in case of a disaster.

E-commerce: Your website and infrastructure can make or break your business

Running an E-commerce business is a daunting task, and trying to ensure its success is even more difficult due to the highly competitive world of digital marketing. Companies are tasked with determining what strategies will work best for their businesses and then need to be able to adapt to overcome various challenges to become successful. 

The importance of scaling 

To thrive as an E-commerce business, it is imperative to master the ability to increase traffic to your website. Successfully incorporating proper scaling into your e-commerce shop is a challenge many online store owners are unable to implement adequately. Having the ability to do so helps your store maintain loyal customers and acquire more new customers than the competition.    

Your website needs to be able to scale up to handle spikes in traffic which occur around busy shopping periods. The revenue from Black Friday 2018 was an astounding $6.2 billion, a 23.6% increase year over year. The revenue made from this day alone is a significant contributor to whether an E-commerce business has had a successful quarter or not – so you don’t want to miss out on any opportunities. It is important to make sure your website is functioning properly on these promotional occasions as there might be a lot of new website visitors who are having their first encounters with your brand, so you’ll want to make a good impression. Most website visitors will be looking to take advantage of the available promotions, so you’ll want to make sure this transactional process is as smooth as possible. I remember an occasion when I was shopping online, and I wasn’t able to complete a purchase because the systems were too busy. This resulted in me getting the item elsewhere, and driving a customer to a competitor is exactly what you don’t want as an e-commerce company.  

Visitor trust is important 

Establishing trust with online visitors is essential. Not everyone who visits your site will be set on making a purchase. Some users will be visiting for the first time and may be hesitant to make a purchase from an unfamiliar site. Establishing trust, even in tiny increments, is the key to keeping more customers at your site during the early stages of the buying cycle.   

A huge factor in gaining trust is having a system that works. If your customers leave due to busy systems or a slow-loading website, chances are those customers will not return, as they perceive you as an unreliable brand. A stable, well-performing e-commerce platform will give your customers a good experience, and they will happily return to purchase more. This means you need to support your website with infrastructure that performs well and can scale up to meet seasonal peak demands.  

One more trust factor is security. As an e-commerce company, your customers trust you with their personal and payment data. Making sure that data is kept safe is vital for your customers, employees, brand, and reputation in the industry. It pays to have measures in place to ensure your infrastructure is secure and monitored.   

Before you should ever consider a redesign for your site, it is important for you to analyze any potential defects in the existing conversion funnel. The lifeline of any e-commerce site can demonstrate what is causing a decrease in sales. You need to track down what is leading to the decline in sales and remedy the problem immediately in order to keep your business alive. There are several ways you can optimize your website to increase sales, and actually most of those have to do with the usability of your site, as well as the accessibility of your checkout and payment processes. If the shopping experience is tedious, your products are difficult to find, and paying for them is a hassle – your customers will go elsewhere.   

Four steps to a better customer experience  

  1. Begin by making sure your website runs properly

The website should load fast, allowing customers to view products and switch from product to product without any downtime. Long waits for pages to load often cause customers to abandon their carts to find websites that function better. Kissmetrics found that 40% of consumers abandon a website that takes more than 3 seconds to load.This means you need to ensure you run your website on infrastructure that can deliver the best possible latency, but can also bring the performance and scalability you need.  

  1. Ensure your website is easy to navigate

Visitors should be able to maneuver from product to product without any issues, and they should be able to locate what they are looking for easily. Customers need to have information easily accessible, as this will keep them happy and encourage them to buy more products and services from you.  

  1. Create a painless checkout process

Examine your existing checkout process. If you have a process that is overly complicated, requiring the customer to go through several steps just to place an order, chances are more customers will abandon carts instead of purchasing items they are interested in. Unexpected shipping costs, requiring customers to create accounts, security issues, and various other factors are leading culprits for abandoned carts. One often-forgotten aspect of the checkout process is the integration of your payment provider. If you have good connectivity, your checkout and payment processes will most probably run smoother, giving your customers a better experience. 

  1. Make security a top priority

If visitors do not feel safe using your website, they will not feel confident in providing their credit card or personal information to you in order to make a purchase. Make sure you choose a trusted hosting partner for your site. 

Trust and usability are key  

If you have an E-commerce aspect of your business, you need a quick and easy shopping and checkout process, and a dependable system supporting everything. Choosing the right type of infrastructure, supported with a set of services that keep things safe and speedy, can make a huge difference in the success of your e-commerce business. 

How to create a 3-2-1 backup system

Remind me, what is 3-2-1 backup? 

The 3-2-1 backup rule means that you should have 3 independent copies of your data – 2 of which are stored on-site for fast restore and 1 is stored off-site for recovery after a site disaster. There are many different ways to create this system, particularly when looking at the on-site options. It’s also worth noting that distinction between replica ‘ready-to-run’ copies and more traditional backup copies is becoming less and less clear, and the terms backup and replication are often used interchangeably. 

Backup vs. replication 

The onsite copy of your data can be a backup copy or a replica of the server you are protecting. The difference between backup and replication is that backup refers to copying files (or data blocks) to some external media, while replication is the creation and synchronization of an exact copy of the server in the native server format. 

A replica is ideal for direct spin-up, while a backup copy usually requires a restore process before it can spin-up. A major benefit of having a backup copy is it typically contains multiple restore points in time. You can go back to the state of the data one week ago or one month ago, for example. 

Designing your 3-2-1 backup combination 

At Leaseweb, there are a number of ready-to-use products which can be used to create a 3-2-1 backup of your server and data. See some examples combinations below.

IaaS Onsite original data Onsite copy Offsite copy 
Virtual Server Virtual Server  Acronis Cloud Backup 
Dedicated Server Dedicated Server other Dedicated Server Acronis Cloud Backup 
Private Cloud Apache Cloudstack Private Cloud Instance  Acronis Cloud Backup 
Private Cloud VMware vCloud Private Cloud VM Veeam Backup Acronis Cloud Backup 
Private Cloud VMware vSphere (single tenant) Private Cloud VM Veeam Backup Acronis Cloud Backup 
On-site storage 

For the original data storage, the infrastructure services are already equipped with redundant storage platforms that have high availability features. Dedicated Servers are typically ordered and delivered with multiple disks in a redundant RAID5/6 setup to protect against disk failure (failed disk hardware replacement included). 

For storing an onsite copy, a Dedicated Server can easily be setup with Private Networking to connect with a Dedicated ‘Backup Storage’ Server. You can choose any available OS feature (or run a software application of your choice) to manage the replication of the data. Examples are Linux DRBD (automatically replicates all data) and Linux rsync (manual file-based replication). For Leaseweb VMware platforms only, Leaseweb offers Veeam Backup which currently functions as a solution for onsite backup. This service does not require a software agent and comes with a self-service management portal. 

Off-site storage 

The offsite backup protects against a complete site disaster. Some backup providers give the option to test (or even run) the off-site backup copy directly within the offsite cloud environment, without the need to restore first to your onsite server infrastructure. 

The offsite copy solution is offered as an add-on self-service. This service is powered by the Acronis Cloud Backup software agent and a self-service management portal. 

Note, for advanced setups, some enterprise customers enable both fast restore and site disaster recovery in one through a twin data center setup, whereby an offsite/twin data center replica enables both fast restore and site disaster recovery. 

Wrapping up 

As you can see from the table above there are various ways to design a 3-2-1 backup using Dedicated Servers and Cloud services. Some companies employ an even more expansive backup strategy, using more than one off-site backup partner to create a 3-2-2 setup for example. There is no such thing as a perfect backup system but diversifying and having different options is only going to improve your chances of a smooth recovery from a disaster.