×

Archive

3 cPanel & WHM Add-ons For Fighting Spam Email

Being a hosting provider isn’t easy. We get that. There are many unforeseeable occurrences that can put a damper on your service — however, spam email shouldn’t be one of them. We’ve highlighted three cPanel & WHM add-ons that you can use to fight incoming spam, malware, and viruses on your server and, ultimately, offer your customers a better experience.

SpamStopsHere
SpamStopsHere is a unique, multilayer filter system that uses four criteria levels to weed out spam and malicious content, while permitting spamstopshere-email-protection-cloud1legitimate email, with a nearly 99.5% success rate. The first layer, the IP Blacklist, flags any email sent from known spam servers. The next layer scans the document for URLs associated with spam. The third layer scans it for strange phrases, rather than keywords, linked to malicious content. Finally, the last layer scans the format of the document for tricks often used by spammers to bypass normal email clients. This robust, dynamic process lessens server load and should make your customers pretty happy.

SpamStopsHere>>>

ASSP Deluxe for cPanel
ASSP (Anti-Spam SMTP Proxy) Deluxe for cPanel is a nifty plugin that eradicates spam email and the easy-to-install widget comes loaded with additional features and customizations. You can set up criterion for custom spam boxes, receive daily email reports, and tinker with a whole host of other automatable functions, cutting a fraction of your workload.

ASSP Deluxe for cPanel>>>

SpamExperts cPanel Add-on
This add-on gives cPanel users one-click access to a wide range of anti-spam solutions packaged within the SpamExperts widget. Not only does spamexpertsSpamExperts’ cPanel add-on protect domains from email-based threats, it enables hosting providers to offer custom spam-fighting tools. Using the SpamExperts plugin, you can increase security for your customers and add value to your business.

SpamExperts cPanel Add-on>>>

Browse the cPanel Application Catalog

*These are 3rd party plugins that are not managed or owned by cPanel, Inc. Issues that may arise when using these products should be directed to the respective plugin developers.

The Different Applications for cPanel Webmail

Webmail is one of the most commonly used features in cPanel. As opposed to having email delivered from the server to a desktop application, Webmail allows users to check their messages from their browsers. Currently, there are three different Webmail applications available, each with their own subtle differences, but all with the same power to deliver secure email on the web.

Horde
The Horde Project is an open-source development community that is responsible for the creation of countless applications and software systems. Vetted and managed by a Core Team, Horde develops tools with PHP that are valuable for small businesses all the way up to the enterprise level. Their focus on enterprise tools has allowed them to create, not only a popular Webmail application, but also a suite of complementary widgets that do everything from managing calendars, notes, and addresses to standard filtering, message flagging, and the search functionality that comes with many Webmail platforms.

RoundCube
RoundCube is the world’s leading open source Webmail application. This application already has millions of users and the upcoming evolution of their product is guaranteed to garner even more attention from users around the world. While not equipped with as many additional features as Horde, RoundCube is praised for its easy-to-use, drag-and-drop interface. Loaded with the ability to search, flag, and organize your email, it makes perusing and managing your inbox (and outbox) super simple.

3 Ways to Prevent Email Abuse

Over 100 billion emails get sent per day. Everything from out-of-office alerts to billing summaries gets transferred across the web, from server to server. While we expect the things we send and deliver to remain secure, we know it isn’t always the case. There are various ways mail servers can be compromised, however, there are also a number of things that you can do, as a hosting provider, to prevent email abuse on your cPanel & WHM server. Here are a few of our easy-to-administer tips.

Require a Minimum Password Strength

We all know….well, we all should know the difference between a secure password and an insecure one:

Less secure: amy1234

More secure: ~4my0n3tw0thr334

With that in mind, ensuring your mail account holders are using secure passwords is one of the simplest ways to protect their information. While capitalization, symbol usage, and spelling all factor into password security, as a hosting provider, you can set a character minimum to ensure that all of your users have a base level of protection.

Learn more about Password Strength Configurations>>

Enable cPHulk

Familiar with the 2012 Marvel film The Avengers? In the final battle sequence, a seemingly unstoppable (keyword) alien army attempts to take down NYC — that is of course until the neurotically lovable Bruce Banner turns into his not-so-jolly green alter ego.

cPanel & WHM includes its own secret weapon that was developed to defend against the onslaught of brute force attacks. By enabling cPHulk, you can drastically prevent brute force attacks from affecting your users, your accounts, or your machine. Simply toggle the feature on from your Security Center and prevent malicious software from trying to muscle through your password security.

Find out the full power of cPHulk by reading our Documentation Site>>

Enable SMTP Restrictions

All online activity happens through a series of rules called protocols. For mail, SMTP, or Simple Mail Transfer Protocol, is the method used to submit messages to mail servers for delivery to the recipient.

With SMTP Restrictions, a feature you can enable straight from WHM, you can prevent spammers from directly interacting with your remote mail servers or even working around your mail security settings.

Curious about SMTP Restrictions? Find out more here in our Documentation>>
There are, of course, many more ways you can up the security on your mail server and protect your customers. If you found this article helpful, be sure to share it with others. If you have a few tips for mail security worth mentioning, let us know by leaving a comment below.

Pointing Two URLs to the Same Website

Introduction
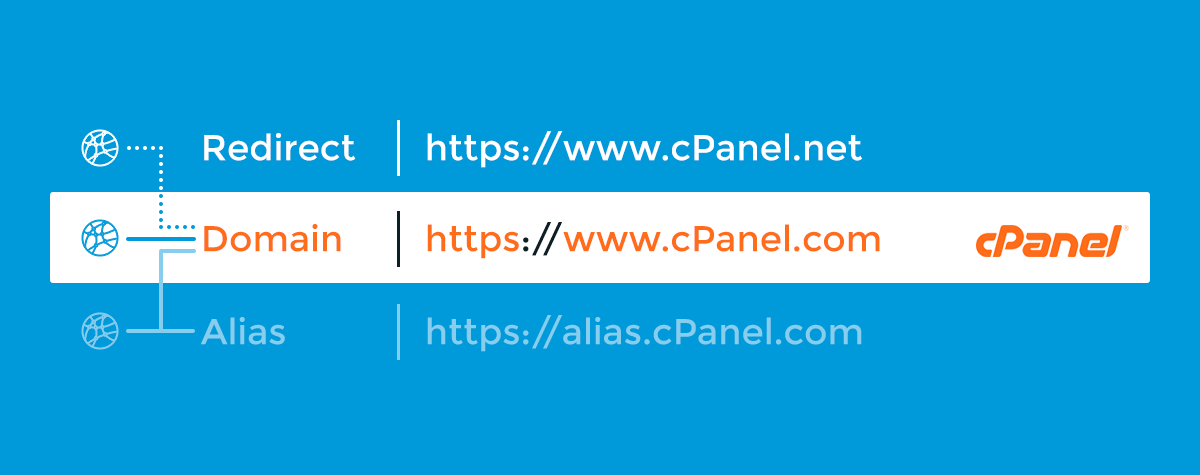
Pointing two URLs to the same website is a good way to direct traffic to your site from several different domain names. You can accomplish this in two ways: either redirect one of the URLs to your primary domain, or create an alias for one of the URLs. The alias would point that domain towards your primary domain.

Redirect a website
A redirect occurs when typing a web address in the address bar sends a visitor to another website (or URL) different from the one they typed in. For example, if you moved your website content to a new URL, you can direct your seasonal visitors (who may remember your old web address better than your new one) to your new location with a redirect.

How to create a redirect with the cPanel interface
You can redirect a website from the Redirects interface in cPanel. Go to the Domains section and click Redirects on the cPanel home page, or type Redirects in the search bar. Follow the prompts to create the redirection. If you need additional help, read our Redirects documentation.

Create an alias (or the action formerly known as parking a domain)
When the system creates an alias, it does the same thing as a redirect; except that the website name shown on the address bar does not change. Think of it as using two different picture frames for the same artwork. The website content is the same for both URLs (the artwork), but what changes is the URL shown in the address bar (the picture frame in the example). For example, example.org is an alias for example.com. Try it!

You can create an alias for several domains to show the same page. The domains have to be registered with a valid domain registrar before you can create the alias. Also, you’ll need to make sure the nameservers are the same as those for your primary domain (the domain that you are pointing towards).

Important: Make sure you know what type of hosting account or package your account has. If you have a reseller account, you will need to ask your provider if you have access or permission to create an alias.

If you do not have this permission, you may be able to redirect one of the URLs instead of creating the alias.
If you have permission, ask for the number of domains for which you are allowed to create an alias.
How to create an alias with the cPanel interface
To create an alias, go to the Domains section and click on Aliases in the cPanel home page, or type Aliases in the search bar. Type your domain name in the Domain text box and click Add Domain.

If there are no issues, you should see a message like the one below:

If there are issues (like your domain having the wrong nameservers), you will get an error message. Make sure you have solved the issues highlighted in the Important section above to minimize your chances for errors.

How to Create a Spam Filter

Let’s be honest, no one likes spam, not hosting providers, not web users, and certainly not us. That’s why it has become a reoccurring subject on the cPanel Blog. So, using one of our favorite features, Apache SpamAssassin, we want to equip you, the cPanel user, with a nifty trick to keep spam out of your inbox.

Apache SpamAssassin™

Preloaded into the cPanel dashboard, SpamAssassin is an open-source tool built to filter and classify emails while blocking spam. Through a combination of subject line and body text analysis, Bayesian filtering, and DNS blacklists, SpamAssassin drastically limits and can prevent spam from touching your inbox.

Creating a Spam Filter

In the Email section of your cPanel account, choose Apache SpamAssassin. (If your hosting provider hasn’t already enabled this feature, select Apache SpamAssassin and then switch it on.)

Now you’re ready to set up email filters and specify how powerfully you’d like SpamAssassin to gate and vet incoming messages.

First, head to the “cPanel Email” section, navigate to “Global Email Filters,” and select “Create New Filter.”

Then, select “Spam Bar” from the first menu in the “Rules” section and then choose “Contains”from the second menu in that same section.

In that field, enter a spam score using a series of (+) symbols, with 5 being an adequate number for an individual user. Select “Deliver to folder” from the “Actions” section and enter the name of the folder to which you would like to direct spam.

Finally, click “Create” to activate the spam filter and, voila, your first filter is set up! (Be sure to check to occasionally check this folder to ensure items that are NOT spam aren’t being flagged.)


To learn more about creating spam filters or Apache SpamAssassin in general, head over to our Knowledge Base.

Managing Multiple Domains from a Single Hosting Account

cPanel has made it easier to manage your domains in a single place. In this post, we will go over how to add another domain to your existing cPanel account. This tutorial will require that you have a hosting account and have access to cPanel to add the domain.

Are you unfamiliar with what DNS is or what the different DNS records mean? Please review cPanel’s DNS FAQ article for more information!

In this walkthrough, cpanel.rocks is our primary domain, and cpdocs.com is our addon domain. We will also need the nameservers from the web host, and the IP address that the addon domain will point to. The IP address is found in cPanel by clicking the Server Information tool under General Information and then viewing the Shared IP address value.

Let’s recap with some example information for the necessary DNS information:

  • cpanel.rocks— The account’s main domain. This domain was set up for you by your hosting provider. In other words, we already control this domain.
  • cpdocs.com — The domain we are going to add to our account.
  • ns1.cpanel.rocks — The server’s primary nameserver.
  • ns2.cpanel.rocks — The server’s secondary nameserver.
  • 209.59.172.159 — The IP address our addon domain will use.

What is an addon domain?

The cPanel “Addon Domains” feature allows you manage multiple domains from a single hosting account. Unlike with Parked domains, Addon domains are expected to be completely different websites all hosted inside the same cPanel account. You can also create additional sub-accounts (for example, email addresses) for your addon domains.

Why addon domains?

You can use them to save money. With addon domains, you don’t have to purchase an additional hosting account for each domain you operate. You can simply create addon domains and split your existing account’s resources.

Addon domains. How do they work?

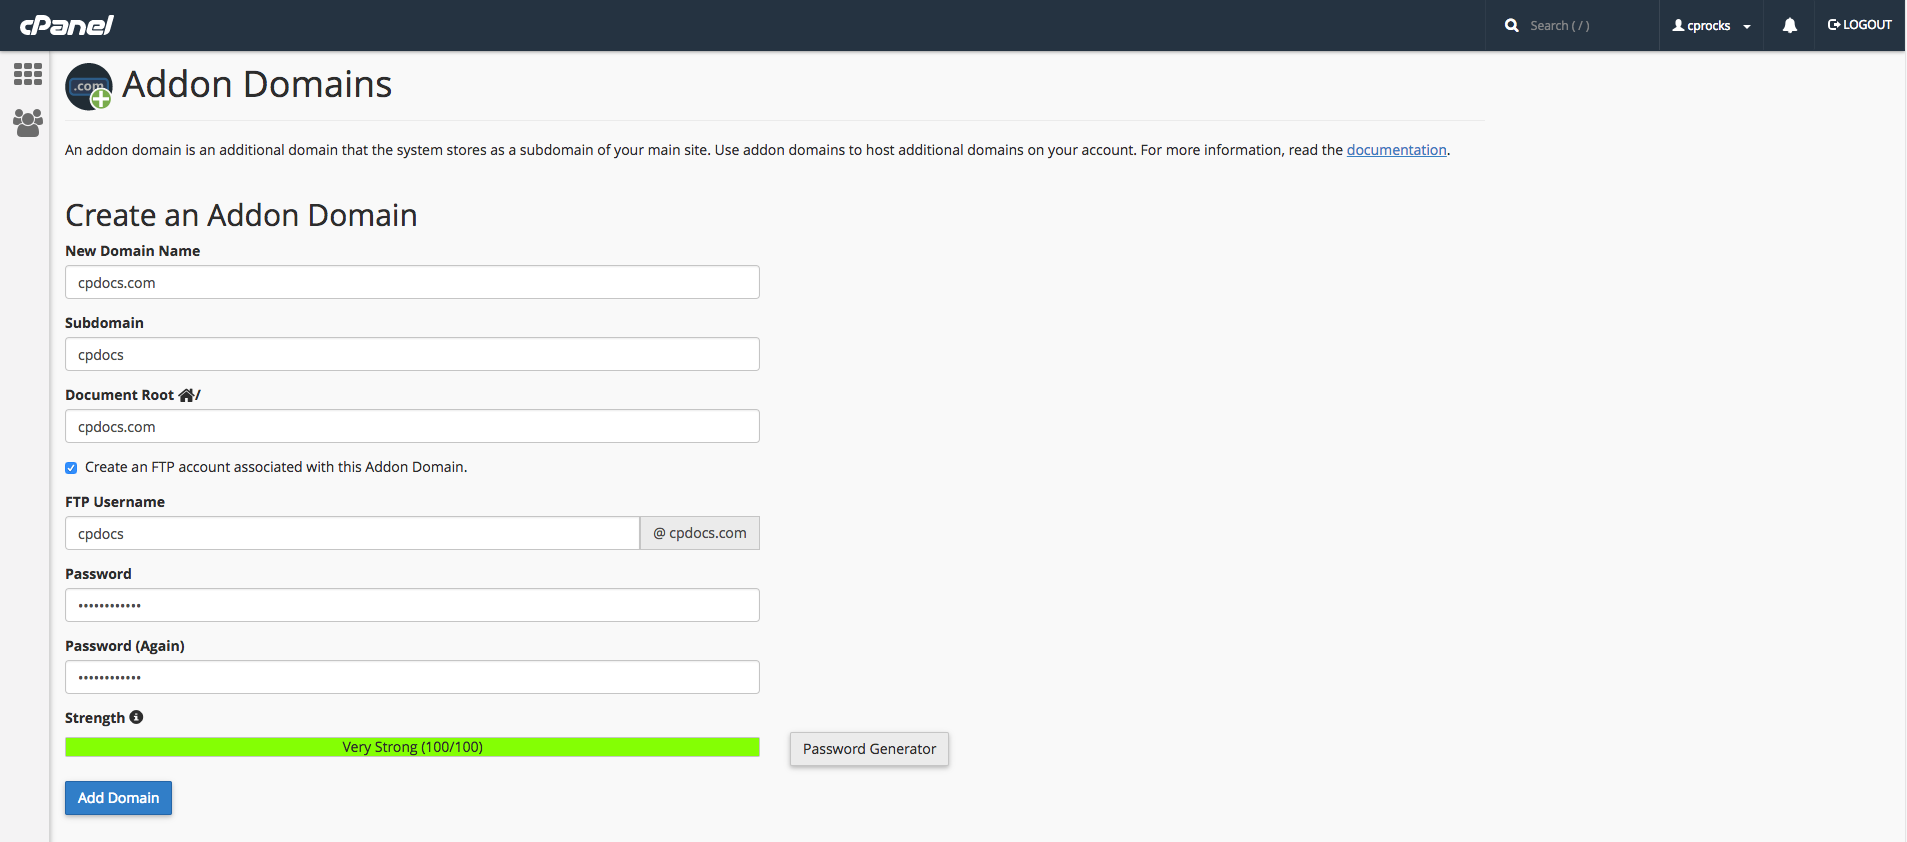
Like subdomains, addon domains are stored in a subdirectory in your home directory. Essentially, online visitors to your addon domain are routed to this directory. As shown below, you may specify the name and precise location of this directory when creating the addon domain. Most commonly, the document root for any addon domain will be in /home/$user/$addon-domain/. In our example, the addon domain’s public_html subdirectory will be /home/$user/cpdocs.com/.

What do I need to do before creating the addon domain?

While not required, it’s a good idea to update the DNS of your domain to resolve to the server where it is hosted. We recommend contacting your web host for the proper nameservers and IP address for your server. Then, take this information to your domain’s registrar (or your hosting provider if they are the domain registrar) and update the domain’s DNS settings. If you’re not sure who your domain’s registrar is, you can always search for your domain on WHO.is. This action will perform a lookup and display which company was responsible for registering your domain. If your domain is not registered, this would be the perfect opportunity to purchase the domain from your preferred registrar.

How do I add the addon domain to cPanel?

To add an addon domain, we can use cPanel’s Addon Domains feature, in the Domains section of the cPanel interface.

  1. Enter the domain name in the New Domain Name field. In this case, we will enter cpdocs.com.
  2. Ensure the FTP username is appropriate in the next field. In this scenario, we will leave it as its default value, cpdocs.
  3. Make sure that the document root is in the appropriate place. In this example, we will use the default value, /home/$user/cpdocs.com/.
  4. Enter and confirm the password you want to use with this domain in the appropriate fields. Note- There is a checkbox to create an FTP account when adding your addon domain. Unless you specifically need an FTP account for the addon domain (i.e., allowing limited access to a developer or similar) we do not recommend creating this FTP account.
  5. Click the Add button.

If you see an error in this interface, that means that your hosting provider has not enabled this feature for your account, or there may be another problem. Please contact your hosting provider to fix the error before continuing.

Verifying our DNS settings

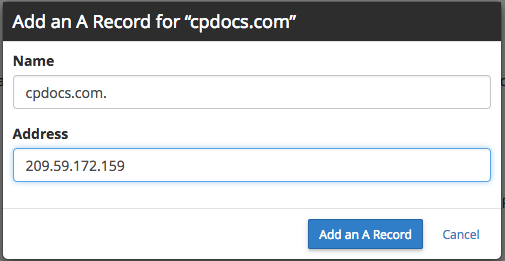
When adding an addon domain, cPanel will automatically create a DNS zone file for the domain. From the Zone Editor interface, we can see that the A record for ‘cpdocs.com’ is set to 209.59.172.159, the cPanel account IP address. If you do not see those options, your account may not have the correct feature permissions. The next step is to talk to your hosting provider to have the Advanced DNS Editor feature added. Once these are enabled, you will be able to see all of the DNS records assigned to your domain.

If you need to assign a different A record to your domain, you may use the “Edit an A record” function in cPanel’s Zone Editor.

Please make sure when editing the A record for your addon domain, there is a period at the end of the domain name. If this period is missing, the DNS record will be incorrect, as it will not be considered a Fully Qualified Domain Name (FQDN). Now that the DNS record has been added, the domain will begin a period of propagation. DNS records can sometimes take up 24 hours to fully propagate so a bit of patience will be required.  Once the propagation period has passed, your domain will be publicly accessible!

Which SSL Certificate is Right For Me?

Early this year Google announced that it would start warning users when a site they visited was not using an SSL Certificate, and we helped you understand the reasons behind SSL Certificates. Today, let’s talk about picking the right one!

No matter what sort of website you may host, protecting and encrypting the data transmitted over the internet has never been more important. From consumer apprehension due to browser warnings to identity theft due to insecure sharing of sensitive data, consumers across the world are learning about the need for security. One easy way to increase the security for your sites is SSL (Secure Socket Layer) Certificates!

What is an SSL certificate, and Why Do I Need One?

SSL certificates are used to allow secure communications between two computers. Whether visiting a website, sending an email, or making a purchase on a site, SSL certificates encrypt the data and those end users that are connecting to it. An SSL certificate validates the identity of the operator of the domain name and encrypts all of the information between the web site’s server and its visitors. This ensures all of the data transmitted over the SSL or TLS handshake has been secured. Think of encryption as a combination lock on a safe- to open the vault; the correct combination sequence is needed.

SSL certificates have two different sets of “combinations,” called keys; a “public key,” which is used to encrypt data, and a “private key,” which is used to decrypt data back to a useable format. Basic SSL encryption breaks down like this:

  1. The user accesses a site with an SSL certificate installed
  2. A secure SSL connection is requested from the website host
  3. The host responds with the valid SSL certificate
  4. A secure connection is established between the browser and host enabling the transfer of encrypted data

Where are SSL Certificates Used?

SSL certificates should be used anywhere where information needs to be transmitted securely. Most commonly, an SSL certificate would ensure secure communication between an e-commerce site and its customers, business’ internal communications, information passed between internal and external servers and mobile devices. SSL certificates are required to secure websites that conduct financial transactions, banking, and financial institutions, or any site dealing with personal, confidential information. Not having an SSL certificate (or the correct SSL certificate) can lower the rate of completed transactions on your site, degrading the trust of your users and potentially impacting your business negatively.

What Types of SSL Certificates Exist?

A very common question, with a bit of a complicated answer, that we are hoping to help you answer below. The three primary types of SSL certificates available are explained below.

Domain Validated SSL Certificates (DV SSL certificate) – these SSL certificates best serve SMBs (small-to-medium businesses) looking for a cost-effective encryption solution. Receiving a DV certificate only requires proof of ownership of the domain the certificate is for, which is provided through a simple email or DNS validation process. Due to the ease of issuing these certificates, DV certificates should only be used for encryption, and cannot be used to indicate the trust level of a domain or the organization that owns the domain. Therefore, it is still on the user to ensure that the site can be trusted, and these SSL Certificates should not be used for an e-commerce solution. They serve best for testing sites, servers, and internal business sites.

Organization Validated SSL Certificates (OV SSL) – OV SSL certificates are essentially the same as DV SSL certificates, however, the domain owners take an additional step by requiring proof of domain ownership and legitimacy. The issuing Certificate Authority (e.g. Comodo, Let’s Encrypt) ensures that the business associated with the domain is in fact registered and legitimate by checking such information as the name of the business, its location, address, and any other legal information (i.e., incorporation).

Extended Validated SSL Certificates (EV SSL)- EV SSL certificates are the highest level of trust that an SSL certificate can receive and are the industry standard for e-commerce websites. When viewing a website secured with an EV SSL certificate, rather than a green padlock and “secure” message next to the domain, you’ll see the entire organization name (the domain’s owner) highlighted in green next to the domain name. These certificates are essential for e-commerce and large business sites where financial and important data transactions occur.

AutoSSL and Market Provider Manager

Historically, purchasing an SSL certificate and installing it were quite difficult and time-consuming. cPanel offers a few different tools that make it easy to install and manage SSL certificates.

Introduced in cPanel & WHM version 58, AutoSSL is a tool that vastly improves the SSL certificate renewal and installation experiences for its users. You are no longer required to manually copy certificates to the correct place or fill out any forms. After enabling AutoSSL, your websites are secured automatically with a free DV SSL certificate. Instead of the hassle of renewing that certificate, it is renewed automatically and installed at the time of expiration.

The Market Provider Manager, available beginning in v56, is an interface provides the ability to purchase and install Comodo and cPanel-signed SSL certificates.  Once a certificate is purchased, the system will automatically download and install the SSL certificate without ever having to leave the cPanel interface.

So Which SSL certificate is Right For Me?

Which SSL certificate you should use is entirely dependent on what your site is for!

Are you curating a Fantasy Football Blog? An episode-by-episode review of Mr. Robot? Then a DV SSL certificate is probably the best SSL certificate for you. If you aren’t selling any items via Shopping Cart or PayPal, a DV SSL certificate is perfect.

Are you a band selling t-shirt, tickets, and vinyl? A real-estate website scheduling appointments for potential clients? OV SSL certificates are what you are looking for, and the extra layer of validation will lend a level of trust to your potential users.

Are you a bank or financial institution? A government entity? Then an EV SSL certificate is the level of validation that is best for you.*

Choosing a Domain Name

Your domain name is more than your online address—it’s your online identity and the public face of your brand. A creative, memorable name plays an important part in drawing visitors to your site, but a dull, generic one can also drive them away. Picking the best domain name for your personal or business presence online is one of the most important decisions you’ll make, and getting it right can be a challenge. Keeping your brand in mind and thinking like a visitor can help you find the domain name that perfectly represents your online self.

Why Do Domain Names Matter?

Domain names are a user-friendly way to avoid dealing with a website’s true online address, the Internet Protocol, or IP, address. The IP address, which is the site’s actual unique locator, is a string of numbers that might have a few other characters thrown in. These addresses are difficult if not impossible for most Internet users to remember and type into a browser search bar.

A site’s domain name stands in for that unwieldy IP address with a word-based format that’s easier to remember and type. Domain names consist of a subdomain name picked by the site’s owner, plus a Top Level Domain, or TLD, that’s designated by a domain extension such as .com, .net, or .net. Within those parameters, a user is free to choose just about any name for a website or business as long as it isn’t already in use. Users can run a domain search to see if the name is available. But, with that freedom comes the responsibility of selecting a name that conveys the right image and enhances the value of a brand over time. It’s a task that can (and should) take some time. Here are some tips for finding your ideal domain name.

Think Like a Visitor

To start your search for the perfect domain name for your brand or business, it can be helpful to think like a potential visitor to your website. What kinds of domain names related to your niche are easiest to remember or type? Which ones stand out for their originality and accurate representation of the brand behind the site? Consider the most important features of your brand and the message they convey, and look for phrases, words, and keywords that might help express those ideas.

If you are having trouble choosing a domain name, to get a better idea you can create a web address with a domain name generators tool.

Make Your Domain Name Brandable

People form an impression of someone within seconds of meeting them, and the same is true when they encounter your domain name. The name you choose is the online representation of your brand, so it’s important to make it stand out from the competition and speak clearly not only of the service or product niche you’re offering, but also of the values and mission behind those things.This will help potential customers remember
your business easier.

It’s also important to think long-term about your domain name. Since that name will be used all over the internet, and potentially offline too, it can be difficult to make a change later if it appears that your name doesn’t really express what your business is about, or if your company opts to expand into other areas. While it’s important to incorporate keywords where possible, stuffing your domain name with generic keywords not only makes it less interesting and memorable, but it also creates limitations if the business changes focus later on.

Make Your Name Memorable

Studies have shown that the most familiar domain names in the world, such as Google, Apple, Facebook, and Twitter, share some key characteristics: they’re creative, instantly recognizable, easy to pronounce and spell—and short.

While keywords can help with searches for your domain, use them sparingly. Consider getting creative with an obscure word or phrase that evokes the spirit of your brand, or using an existing word in a new way. The most memorable sites online typically have short, punchy names that are between 6 and 14 characters long, which makes them easy to remember and type into a web browser.

Word spreads about a brand in a variety of ways, even word of mouth. Domain name experts recommend choosing a name that is easy to say as well as to type. That means avoiding names that contain numbers, hyphens, or other special characters that make them hard to pronounce, as well as hard to remember. If your company or brand has a long name, though, consider using its initials, perhaps in combination with a single relevant keyword.

Choose the Best Domain Extension

The extension, the part of your domain name after the “dot” that designates a top level domain, can also help or hurt your name. The most recognizable extension in the world is still .com, even though many more are now available, and because of its familiarity and association with commerce and reliability, .com remains the best choice in most cases.  If .com is not available, consider other neutral extensions such as .net or .info. While new extensions like .church or .photo can help to instantly convey what a site is about, more fanciful choices such as .me or .pizza may not convey the right image—or stand the test of time.

Claim Your Name in All Possible Ways

Since a domain name represents its owner everywhere online, claiming it in every possible way keeps it visible and avoids confusion. Research possible alternatives to the desired name and purchase those domains if possible—including potential misspellings of the name. That also includes variations used for social media accounts, so that a brand is consistently represented everywhere it might be found.

Do Your Research

The Internet is home to more than 1.3 billion websites, so there’s a good chance that any domain name, however unique and creative it may sound, has been taken in some way. Research your domain name carefully using domain name generators, keyword searches, and trademark searches to be sure that it avoids infringing on other existing uses, which could lead to legal action and the need to start over with a different name.

Choosing the right domain name to be the online face of a brand or company can be a challenging task. But, with planning and careful consideration, you can create an unforgettable domain name that stands the test of time.

Our Top 5 Tips to Reduce Spam or Junk Email in Your Inbox

While it’s not possible to completely eliminate spam messages, these 5 tips will reduce the number of junk emails in your inbox.

1) Use a spam filter.
It sounds obvious, but it is surprising how many people do not use spam filters to protect their inbox from spam and phishing emails.

2) Keep your email address private.
Don’t publish your email address anywhere on the web. If your email address is posted on a public guestbook, blog, or forum your inbox could very soon be cluttered with junk email. Automated bots crawl the web collecting these addresses 24 hours a day, seven days a week.

3) Create a spare email address.
Treat your spare email address as your public one. Use it online in forums, chat rooms, and when subscribing to mailing lists and promotions. Remember your spare email address is a temporary one. Don’t be afraid to change it often.

4) Handle with care.
You should never respond to any email address that you believe to be spam. This just tells the spammers that their email addresses are reaching your inbox! You should also consider turning read receipts off. These are often used to determine whether the emails are reaching a live inbox. Finally, never use the unsubscribe link unless you actually remember signing up to receive mail from the sender originally. Again, this is just another way for spammers to determine which emails are reaching an actual person.

5) Use disposable mail.
If you are forced to enter an email address somewhere on the web where the authenticity of the website is questionable, use a temporary email address! A service like 10minutemail.com will give you access to a working email address so that you do not have to risk using your personal address on a website you do not trust. Once you have finished, simply exit the website and you can leave knowing you will never receive any unwanted mail as a result of it.

The fight against spam has been ongoing since the first recorded incident in 1978 which affected 393 individuals. More than 30 years later, spam is reaches billions of internet users worldwide. It may not be possible to completely eliminate spam, but we can all do our bit to reduce the impact it has on our inbox.

Just be vigilant online and treat your email address like your house number and zip code; you wouldn’t post that everywhere would you?

Why You Need a Spam Blocker Like Akismet

Spam is the bane of every website. Spam comments that show up with generic praises for the quality of your posts along with questionable backlinks can slow your site down and interfere with legitimate comments from real readers. A number of WordPress plugins are made to handle spam comments, but the Akismet plugin tops the list. It is one of only two plugins built into your self-hosted WordPress installation, and it’s designed with one goal in mind: to stop spam from clogging up the comment function on your WordPress site.

Why You Need a Spam Blocker Like Akismet

Spam takes many forms, but all kinds of spam share a few common features. Spam is the nickname for Unsolicited Commercial Email, which is sent in vast amounts from questionable sites looking for backlinks, trying to get search engine recognition or “phishing” for users’ personal information.

Spam emails show up in the comments section of many WordPress sites, especially new ones. These emails often have a message proclaiming how interesting the site is, with no actual reference to the content. Typically, they’re promoting some type of product or service, and they usually include a link to another site. Left untended, spam can accumulate at the rate of hundreds per day. This can slow your site’s performance and even raise red flags with hosts and search engines. And the attention spent identifying and deleting these comments takes valuable time away from other tasks.

Spam-blocking plugins identify these kinds of email comments and filter them out, leaving only legitimate comments for site runners to moderate. Not all websites need spam blockers, though. Some sites opt to eliminate comments entirely with plugins, like the free “Disable Comments” plugin from the WordPress Plugin Directory. If comments are disabled, spam comments won’t appear; but enabling comments allows website owners to engage with visitors, build a community and promote brands, so responding to legitimate comments can be a valuable tool. Akismet WordPress plugin filters comment automatically, leaving (in most cases) only real comments from site visitors in your site’s comment section. Winning the war against spam is made possible when using a plugin like Akkismet.

Akismet Blocks Spam Automatically

Akismet was developed by Automattic, the development team behind WordPress itself. That explains the “A” in its name. It appears by default in the Plugins list of every new WordPress installation, but it requires a few additional steps for activation. Akismet operates from algorithms that define spam emails based on identified spam from multiple sites. This algorithm can “learn” new spam addresses as it operates so that it can filter with more accuracy. Once identified, these spam comments are diverted to a spam file where they can be deleted. Only legitimate comments should make it past the filter for moderation and responses. If you are trying to reduce spam or junk email on your site, downloading Akismet is an easy way to do it.

Once Akismet is activated, it runs in the background, blocking spam as it appears, but users can set specific parameters in the filter, such as keywords, links or addresses, too. Because Akismet is algorithm based, it can make mistakes. Some real comments can be blocked, and in some cases, a few spam emails can make it through. It’s wise to periodically check the spam file to see if a non-spam comment was missed. Likewise, users can manually mark comments as spam, and Akismet then adds that information to its algorithm for future filtering.

Setting up Akismet

Installing WordPress plugins is fairly easy. Although Akismet appears by default in your Plugin list, it requires an API key for activation. This can take a few extra steps on external sites. To get started, select “Activate.” The Akismet configuration screen appears, along with a prompt to enter your Akismet API key.

To get the API key, you’ll be taken to the Akismet website. Click on the button for “Get a WordPress key.” This opens a screen with Akismet plans and pricing. Akismet’s pro plan for a single business website costs around $5 per month, and an enterprise plan for unlimited websites is available for $50 per month. But if you’re activating Akismet on a single personal site, Akismet invites you to name your price – which could be free. Select the plan you want and click “Sign Up.”

Somewhat confusingly, this step takes you to additional signup with WordPress.com, the hosted version of WordPress that’s home to many smaller sites and blogs. You don’t need to create a site with WordPress.com, though. You simply need to create a WordPress.com account in order to get access to the Akismet API key.

After creating a new WordPress.com account, you’ll return to Akismet to finish signing up. Once you’ve selected your plan and payment option, you’ll be prompted to get the Akismet key. Your key is stored in your Akismet account and can be recovered at any time. Copy the Akismet key and return to your WordPress site’s plugin list. Paste the API key into the Akismet configuration screen and Akismet is immediately activated.

Spam Detection with Akismet

Along with blocking spam comments, Akismet tracks statistics on your WordPress dashboard. These stats can show how many spam comments were caught by Akismet and how many are held in the spam folder. Akismet stats can also be displayed to site visitors on pages and posts with the Akismet widget, which can be placed in any widget area allowed by your site’s theme.

Managing Akismet on Your Site

Akismet spam protection also integrates with some of the best WordPress plugins as well. It’s regularly updated by the Automattic team, so it’s important to install updates as they appear. As a site grows, users can switch Akismet plans at any time to get the features they need. Akismet can be deactivated if it’s no longer needed and reactivated at a later time. Akismet spam protection is an effective tool, but it may not be the only comment management plugin your site needs as it evolves. Other plugins can be installed alongside Akismet to perform different tasks related to moderating and managing comments.

On popular websites, the rate of spam can be as high as 85 percent, and smaller sites can see hundreds to thousands of spam comments every day. Accumulated spam can compromise both your WordPress site’s functioning and its authority, but Akismet’s constantly evolving algorithms can block most spam automatically, so you can connect with your site’s legitimate visitors.